Automated regression testing of Chromecast using Cucumber, JRuby and Rukuli

As you may know, i work as a Developer In Test for Media Playout at the BBC. We enable audio and video playout on the web (desktop, tablet and mobile) using our Standard Media Player.

We recently added support for Chromecast, and i want to write a bit about how i automated testing for it.

Chromecast HDMI dongle

Chromecast HDMI dongle

Chromecast is a HDMI dongle that plugs into a normal television and adds connected TV functionality. The neat thing is you can control it from your laptop, tablet or mobile using the media apps that you already know, such as YouTube, Netflix and now BBC iPlayer. Google also provides an API so that new Chromecast apps can be written all the time.

So how do you test a Chromecast? Well, personally i like to test things from an user’s point of view, actually clicking things and observing what happens as a result. But there’s only so far you can take this. I don’t want to rely on a television having a Chromecast being plugged in all the time and on the same network so that i can talk to it.

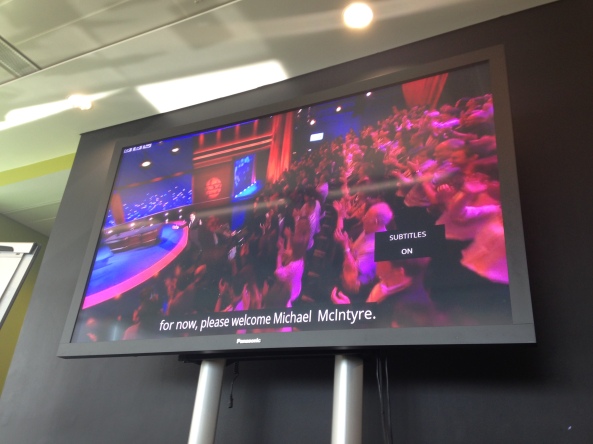
Though i’ve got to say .. it would be quite awesome to use a television 2 metres wide for my automated regression testing! :p

About to start casting

About to start casting

I didn’t need to test the Chromecast receiver app; that had already been written and tested by the guys in Salford for use by the iOS iPlayer app. I realised, what we actually care about is the communication between our player and the Chromecast. And there is a well documented Chromecast API. So with the help of colleagues Tim Hewitt and Wyell Hanna, i set about creating a fake Chromecast. Pretty much a bit of javascript that would respond in the same way as a real Chromecast, so that we could test how our player would respond to it.

And now i present to you .. the fake Chromecast!

https://gist.github.com/sermoa/10988494

A lot of it is empty methods that are neccessary to the API. But there are some neat tricks here too. I’ll talk you through a few of the more interesting bits.

Firstly we need to load the fake Chromecast into the page. We can achieve this with a @chromecast tag and a Before hook.

Before('@chromecast') do
  $chromecast = Chromecast.new
end

My Chromecast class has an initialize method that inserts the javascript into the page.

class Chromecast

  def initialize
    $capybara.execute_script <<-EOF
      var el=document.createElement("script");
      el.type="text/javascript";
      el.src = "https://gist.githubusercontent.com/sermoa/10988494/raw/82e08c5a29b5689b5e9f3d03c191b8c981102d85/fakeChromecast.js";
      document.getElementsByTagName("head")[0].appendChild(el);
    EOF
    @media_alive = true
  end

end

With this in place, so long as i set up our player with the relevant business logic that says casting is available, when i hover over the player, i get a cast button!

  @chromecast
  Scenario: Chromecast button appears
    Given Chromecast is available
    When I play media
    Then I should see the Chromecast button
A cast button appears!

A cast button appears!

So how does that work? I assure you, i don’t have a Chromecast on the network right now. I’m not using the Google Chrome extension. I’m actually running it in Firefox! What is this voodoo?!!

Have a look at the fakeChromecast.js file:

window.chrome = {};
window.chrome.cast = {};
window.chrome.cast.isAvailable = true;

See that? We’ve set up a Chromecast and said it’s available! Sneaky, hey? It’s that easy, folks! :)

The Standard Media Player will now attempt to set up a session request with its application ID. That’s fine: we’ll happily enable it to do its thing.

window.chrome.cast.SessionRequest = function(a) { }

Obviously a real Chromecast does something rather significant here. But we don’t have to care. This is a fake Chromecast. We only provide the function so that it doesn’t break.

Next, the media player makes a new ApiConfig. It’ll pass the session request it just obtained (in our case it’s null, but that doesn’t matter), and two callbacks, the second being a receiver listener. That’s the important one. We want to convince it that a Chromecast is available, so we trigger this callback with the special string “available”.

window.chrome.cast.ApiConfig = function(a, b, c) {
  c("available");
}

So Chromecast is available. Now suppose the user clicks the button to begin casting. This should request a session.

  @chromecast
  Scenario: Click Chromecast button and connect to a session
    Given I am playing media
    When I click the Chromecast button
    Then I should see Chromecast is connecting
Connecting to Chromecast

Connecting to Chromecast

How did we do this? Easy! The media player requests a session, sending a success callback. Fake Chromecast store a references to that callback – on the window so that we can trigger it any time we like! The callback function is expected to provide a session. We send it a reference to a fake session, which is entirely within our control. Oh it’s all so much fun!

window.chrome.cast.requestSession = function(a, b) {
  window.triggerConnectingToCC = a;
  window.triggerConnectingToCC(window.fakeSession);
}

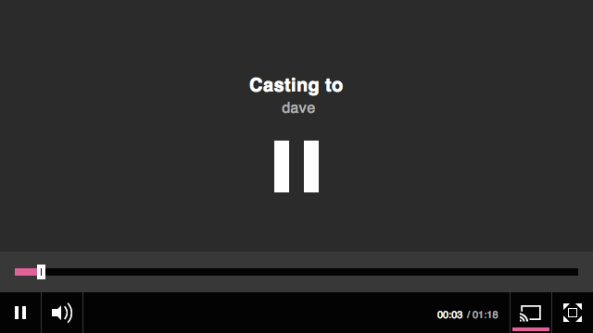
As the documentation says, “The Session object also has a Receiver which you can use to display the friendly name of the receiver.” We want to do exactly that. We decided to call our fake Chromecast Dave. Because Dave is a friendly name! :)

window.fakeSession = {};
window.fakeSession.receiver = {friendlyName:"dave", volume:{level:0.7}};

I think i found our app expected the session receiver to supply a volume too, so i added that.

The media player does some shenanigans with media that we don’t need to care about, but when it sends a request to load media it passes its callback to trigger when media is discovered by Chromecast. That’s another important one for us to keep, so we store that one. We wait 1 second for a semi-realistic connection time, and then trigger it, passing a reference to .. fake media, woo!

window.fakeSession.loadMedia = function(a, b, c) {
  window.pretendMediaDiscovered = b;
  setTimeout(function() {
    window.pretendMediaDiscovered(window.fakeMedia);
  }, 1000);
}

And now we are almost there. The last clever trick is the communication of status updates. The media player sends us a callback it wants triggered when there is a media status update. So we store that.

window.fakeMedia.addUpdateListener = function(a) {
  window.updateCCmediaStatus = a;
}

The magic of this is, we stored the references to fakeMedia and fakeSession on the browser’s window object, as well as the callbacks. This means the test script has access to them. Therefore the test script can control the fake Chromecast.

So you want Chromecast to report playing? Make it so!

  @chromecast
  Scenario: Begin casting
    Given I am playing media
    When I click the Chromecast button
    And Chromecast state is "PLAYING"
    Then I should see Chromecast is casting
We are casting!

We are casting!

What does that mean, Chromecast state is “PLAYING”? It’s pretty straightforward now, using the objects and callback functions that the fake Chromecast has set up:

When(/^Chromecast state is "(.*?)"$/) do |state|
  $chromecast.state = state
  $chromecast.update!
end

Those two methods get added to the Chromecast Ruby class:

class Chromecast

  def initialize
    $capybara.execute_script <<-EOF
      var el=document.createElement("script");
      el.type="text/javascript";
      el.src = "https://gist.githubusercontent.com/sermoa/10988494/raw/82e08c5a29b5689b5e9f3d03c191b8c981102d85/fakeChromecast.js";
      document.getElementsByTagName("head")[0].appendChild(el);
    EOF
    @media_alive = true
  end

  def state=(state)
    @media_alive = false if state == 'IDLE'
    $capybara.execute_script "window.fakeMedia.playerState = '#{state}';"
  end

  def update!
    $capybara.execute_script "window.updateCCmediaStatus(#{@media_alive});"
  end

end

Note that i had to do something special for the “IDLE” case because the media status update expects a true/false to indicate whether the media is alive.

So, using these techniques, sending and capturing events and observing reactions, i was able to verify all the two-way communication between the Standard Media Player and Chromecast. I verified playing and pausing, seeking, changing volume, turning subtitles on and off, ending casting, and loading new media.

This fake Chromecast is a lot faster than a real Chromecast, which has to make connections to real media. It’s also possible to put the fake Chromecast into situations that are very difficult to achieve with a real Chromecast. The “IDLE” state, for example, is really hard to achieve. But we need to know what would happen if it occurrs, and by testing it with a fake Chromecast i was able to identify a bug that would likely have gone unnoticed otherwise.

For the curious, here’s a demo of my Chromecast automated regression test in action!

This is all a lot of fun, but there is nothing quite like testing for real with an actual Chromecast plugged into a massive television!

Testing Chromecast for real

Testing Chromecast for real

So that’s how i test Chromecast. If you want to test Chromecast too, please feel free to copy and tweak my fakeChromecast.js script, and ask me questions if you need any help.

Colemak is easy to learn!

If you touch-type QWERTY you already half-know Colemak.

Many of the keys stay the same, which means many of your shortcuts remain the same. On a Mac, these shortcuts are Undo, Cut, Copy, Paste, Bold, Minimize, Hide, Quit and Close.

The keys that do move don’t go far, usually one or two keys away. Mostly we’re trying to get the common letters on to the home row and move the uncommon ones away. Many keys that move stay on the same finger, or at least in the same hand. Only E and P swap hands. In Dvorak, 22 keys swap hands.

The punctuation keys don’t move, except for the colon/semicolon (no way that gets to stay on the home row!) In the Dvorak layout, all of these punctuation characters move: fullstop, comma, question mark, single quote, double quotes, square brackets, curly braces, angle brackets, dash, underscore, plus and equals. It’s a nightmare for programmers!

If you were to scratch off the keys that have moved, look how many you’d have to remove for Colemak compared to Dvorak:

Learning Colemak vs Dvorak keyboard layout

As if you didn’t know, QWERTY is inefficient. Dvorak is a lot better, but Colemak is by far the best. To prove this point, here is the heat map of typing this very blog post on QWERTY, Dvorak and Colemak:

Why Colemak is best

Row usage compared between QWERTY, Dvorak and Colemak

There are other reasons here to explain why Colemak is easy to learn.

With the holidays coming up, do your future self a favour and learn Colemak!

Update: so you’ve decided you want to learn Colemak and want to know how to go about it? AWESOME! I have just the post for you: How to learn Colemak.

Colemak and vim: “But what about h/j/k/l?”

I have my phone set to alert me when anyone mentions Colemak on twitter. It’s a fun one to follow, you get new people trying out Colemak at least once a week, and i love to encourage people.

One thing i see a lot is programmers talking about vim, and asking what you do about the h/j/k/l keys. Do you remap them or relearn them?

There is at least one person who has made a colemak-vim remapping plugin (see this discussion in the Colemak forum), but i can’t imagine it working well. If you try to put h/j/k/l back where you’re used to them then you have to find new homes for n, e and i. (h actually stays in the same place) As you may well know, if you’re reading this, n is next search match, e is end of word, and i gets you to insert mode.

So if you move those keys, where would you put them? Almost every letter in vim has some sort of significance, and many of them are chosen for the action they stand for, which is part of the power of vim.

My answer is to relearn them. Maybe it’s easy for me because i was on Dvorak when i learned vim, so i was never attached to the position of h/j/k/l in the first place. Curiously enough, in Colemak h/j/k/l all end up on the same finger: the index finger of the right hand. Some people complain that j and k feel upside down, and they do at first, but then you realise that Apple is busy rewiring our brains with “natural scrolling” (which i think is just awesome, by the way) and before you know it, Colemak and vim feel perfectly wonderful together!

So my advice: print out one of these Colemak/vim cheat sheets and just get used to it!

vi / vim graphical cheat sheet - Colemak version

Look! i’ve even done a typematrix version for all you Colemak people who pair program and need a keyboard with a hard wired Colemak switch!

vi / vim graphical cheat sheet - Colemak TypeMatrix version

Of course, the other great thing to note about Colemak is one of its big advantages over Dvorak: that punctuation characters remain in their QWERTY positions. Which is very useful for vim users! :)

Git: remove a submodule

For years, i’ve been searching the internet every time i want to do this. Various guides have come and gone. I rarely deal with git submodules anymore since the dawn of Bundler, but every now and then i find i want to remove a submodule in order to convert to bundler.

So once and for all, here’s the process, for example i am deleting a cucumber rails plugin:

Remove the three lines from .gitmodules

[submodule "vendor/plugins/cucumber"]
	path = vendor/plugins/cucumber
	url = git://github.com/cucumber/cucumber.git

Remove the two lines from .git/config

[submodule "vendor/plugins/cucumber"]
	url = git://github.com/cucumber/cucumber.git

Delete the git reference file that holds the submodule’s SHA commit id. Note the important lack of a trailing slash.

git rm --cached vendor/plugins/cucumber

Git will now see the entire directory as new files, because it’s no longer a submodule. Now you are free to delete the whole lot.

rm -rf vendor/plugins/cucumber/

And now you can add it to your Gemfile to use with bundler :)

QIDO for Colemak please!

As most of my followers are probably well aware, i’m a bit of a nerd on the matter of keyboard ergonomics and keyboard layouts.

For any Dvorak typists, the QIDO (QWERTY In, Dvorak Out) is a very useful device that converts any USB keyboard into a Dvorak one. It is a spin-off product of KeyGhost, a hardware keylogger, but in this case put to a completely different use.

They QIDO plugs between the keyboard cable and the USB port on the computer, and it translates all keyboard input signals into the Dvorak letters. Reminds me somehow of a Babel fish! :) Having a QIDO means you don’t have to switch keyboard input at the operating system, especially useful if you’re pair programming with someone who types on QWERTY.

A few months ago i wrote to KeyGhost, the makers of the QIDO, to ask for a Colemak version (or even better, a programmable version) of the QIDO. Theo Kerdemelidis gave this reply:

We have had a few requests for Colemak support, so we will look into it as soon as we have a chance.

I know they also sent the same response to someone else who asked for a Colemak QIDO at the same time. As far as i’m aware they are still sending out the same reply to people who ask.

So i have a task for you! If you could use a Colemak QIDO (or QICO as they might call it!) please email helpdesk@keyghost.com to let them know your interest. If you get any reply, please let me know here.

Dvorak might be more popular at the moment, but that’s only because it’s been around for a lot longer than Colemak. We know that Colemak has the edge, and it’s getting more popular all the time. Let’s give KeyGhost all the encouragement we can to get a Colemak version of the QIDO made soon! :)

Computer generated art

I woke up yesterday with a simple idea for generating a picture based on an input string. I don’t exactly know where the idea came from, but i think i’ve been influenced by Nick Huggins, whose abstract work i adore, and also in a way by QR codes. I’m not a particularly artistic person, but i figured i could come up with an algorithm and let the computer do the creative bit for me! :)

So i installed the open source tools ImageMagick and RMagick, learned a bit about the RVG library, and set about trying some ideas. I fiddled and tweaked the algorithm until it seemed to consistently output something that was reasonably pleasant. Here is the picture for my name, and for my twitter id.

aimee @sermoa

Having tried random numbers and obvious inputs like my name, i searched for other input sources. Being interested in community generated content, i wrote a script to fetch the current top twitter trends. Here are the results.

Kim Hee Chul Solomon Burke Steamed Bun #thingsyoushouldntsay HEEBUM
#badsongsinjail Limera1n Aiden #bsr_tousounow One Direction

As you can see, some come out better than others. I’m adding the input string mostly for debugging purposes so that i can see how the image was seeded. When i get one that i like, i can increase the blur and remove the input string. For example, i really like the images produced by “Kim Hee Chul” and “#bsr_tousounow”, so let’s try with a bit more blur.

Kim Hee Chul (with more blur) #bsr_tousounow

Nice, hey?! Not sure they’re ready for a gallery just yet, but certainly an interesting experiment.

Everything in the picture is generated from the input string: the size, colour, number of boxes, box sizes, opacity, border style. It is extremely unlikely that any two input strings would ever generate the same picture. However, the algorithm is not random. Given an input string, you’ll always get the same picture, though i may choose to do some post-processing on it (such as blur, frame, lighten or darken).

In the interests of sharing knowledge here is the main structure of my generator, but the really creative part is in how it comes up with the numbers, which is going to remain a secret, sorry!

I am willing to generate images for anybody who asks nicely! :)

Packard Bell Mustek Bearpaw scanner on Ubuntu/Mint

I am quite sure that nobody cares about this except for me, unless they happen to have a similar scanner to mine. I’ve had to do this process about 5 times now on different installs. I can guarantee that it works for Fedora, Debian, Ubuntu and Mint. I thought i’d share it because i’ll probably need it again and someone else might find it helpful.

First you need xsane to be able to scan things at all.

sudo apt-get install xsane

Plug in your scanner by USB. Attempt to scan by typing scanimage. It won’t work, but you need to see the error message.

scanimage
[gt68xx] Couldn't open firmware file (`/usr/share/sane/gt68xx/PS1Dfw.usb'): No such file or directory
scanimage: open of device gt68xx:libusb:004:002 failed: Invalid argument

See that PS1Dfw.usb? You need to get that file from http://meier-geinitz.de/sane/gt68xx-backend/ but be aware that your computer might ask for a different file such as ps1fw.usb or ps1fw.usb. Whichever it is, find it on the page and click it to download.

Assuming it’s gone into your Downloads folder, move it to the right place.

sudo mv ~/Downloads/PS1Dfw.usb /usr/share/sane/gt68xx

Now try the scanimage command again. With any luck your scanner will burst into life and a whole load of crazy gobbledegook will splurge into your terminal window. This is the picture your scanner is seeing, trying to be displayed as text! Don’t be afraid to Ctrl-C to stop it once you see it working. Or you can just wait for it to finish.

You can also do this to ensure that your scanner is configured correctly:

scanimage -L
device `gt68xx:libusb:004:002' is a Mustek Bearpaw 1200 CU Plus flatbed scanner

Now to actually scan something! Open up The Gimp and click File -> Create -> XSane -> gt68xx:libusb:004:002

It comes up with this super ugly XSane interface, where you can make a preview, choose the scan area, fiddle with the colour settings and DPI settings, and scan an image.

XSane scanning an image on Linux Mint

When it’s done, it’ll come back to The Gimp ready for you to edit the scanned image.

Protip: If you lose one or more of the XSane windows, you can get them back again by going to the Window menu of XSane and ticking on the ones you need.

Gowalla pins

As of Monday, 5th July, these are the 38 pins currently available on Gowalla, grouped by category. I just made this because it’s sometimes hard to see what all the pins are at a glance.

If you’re curious about Gowalla, see my other introductory post: Gowalla tips.

Installing Gowalla

I Installed Gowalla I Installed Gowalla

Checking in

Wanderer Wanderer Check in at 5 different Spots to receive the Wanderer Pin.
Sightseer Sightseer Check in at 10 different Spots to receive the Sightseer Pin.
Ranger Ranger Check in at 25 different Spots to receive the Ranger Pin.
Discoverer Discoverer Check in at 50 different Spots to earn the Discoverer Pin.
Explorer Explorer Check in at 100 different Spots to receive the Explorer Pin.
Wayfarer Wayfarer Check in at 250 different Spots to receive the Wayfarer Pin.
Voyager Voyager Check in at 500 different Spots to receive the Voyager Pin.
Epic Voyager Epic Voyager Check in at 1,000 different spots to receive the Epic Voyager Pin!

Continue reading

don't you just love an awesomesauce #tupperwarebox

This weekend the world went mad for Tupperware Boxes.

Key output:

Some rather bizarre songs:

My dog’s favourite thing is my #tupperwarebox, it’s full of treats and nom, she behaves so well when it’s around, I think I’ll tie it on.

I’ve got a massive #tupperwarebox it’s got a special lid that clicks and locks

Come on and let’s rock! Everybody let’s rock! Everybody in the whole cell block was dancing to the #tupperwarebox!

How I love my little #tupperwarebox! You can a-store my cheese, you can a-sit on my knees, feels like a picnic right here at home…

A quiz: “Which #tupperwarebox would you be?”

A twitter retweeter bot: @tupperwarebot – the cool thing about this was i learnt how to use Yahoo Pipes and made a pipe that finds relevant tweets and manipulates the stream to become retweets with the hashtag #tupperwarebox

A Justin Bieber in a #tupperwarebox which gained the @tupperwarebot a lot of Justin Bieber fans!

Justin Bieber in a #tupperwarebox on Twitpic

This is actually quite disturbing when i found there is a rumour that Justin Bieber got stuck in a toy box at age 7 and suffers from claustrophobia. But anyway, the fans seem to like it. They appreciate the randomness of it and came up with the hashtag #justininatupperwarebox!

Finally, there is a Facebook group: Tupperware Box! If you are a fan of Tupperware and/or pure random nonsense, please don’t hesitate to join! :D

FB.init(“f76c8ae933a8204f4a989f77369fa340”);

Tupperware Box on Facebook

A quick way to resize images in Linux

Quite often i find myself wanting to resize a whole directory of images. Rather than opening them all in the gimp, i do it through the command line. I seem to do this often enough that it’s worth recording here, for my own reference as well as for anybody else who would find it useful.

First of all, you need imagemagick.

sudo apt-get install imagemagick

Change directory to where the images are and create a subdirectory for the resized versions.

cd ~/Photos/2010/04/05
mkdir resized

My phone likes to put spaces in file names which really confuses things, so i convert them to underscores. You can skip this step if your filenames contain no spaces.

for image in *.jpg; do mv "$image" `echo $image | tr ' ' '_'`; done

Now for the clever bit: i run convert command on the image files, resizing them to 1024px and saving with a quality of 80%.

for image in *.jpg; do convert $image -resize 1024 -quality 80 resized/$image; done

Lovely wonderful linux! :D

One thing to note: it always resizes along the top edge, which may not be the longest edge. If you have a portrait file which is 1536×2048 it comes out at 1024×1365 (not 768×1024 as you might have expected).

The resize option can take a percentage, so if you know all your images are the same size then you could just send a 50% to reduce to half size.

for image in *.jpg; do convert $image -resize 50% -quality 80 resized/$image; done

Imagemagick is super-incredible-awesome so there probably is a way to deal with differently sized images at different orientations. If anybody knows, please add it in the comments! :)